
Workable Methods to Get Over QuickBooks Error 12031
When upgrading QuickBooks Desktop, users may encounter QuickBooks Error 12031, an error typically encountered when users try refreshing the QuickBooks program. This article provides valuable information and various troubleshooting methods to resolve this error. To effectively fix QuickBooks error 12031, we recommend reading this entire article and following the recommended precautions.
Causes of QuickBooks Error 12031
- Poor internet connection.
- Firewall settings may disrupt QuickBooks services and processes.
- Improper SSL settings.
Steps to resolve QuickBooks Error 12031
Method 1: Update QuickBooks
- Open QuickBooks.
- Select the Help option.
- Choose Update QuickBooks Desktop.
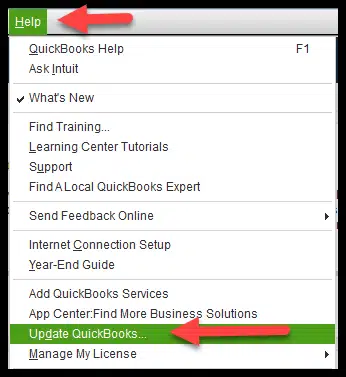
- Check for available updates and click on the option to download them.
- Close QuickBooks and restart the application.
- Allow the updates to install when prompted.
- Verify if QuickBooks Error 12031 still persists.
Method 2: Adjust Internet Explorer settings
- Close the QuickBooks program.
- Open Internet Explorer.
- Select Tools.
- Choose Internet Options.
- Go to the Content tab and following that, advance to the Security tab.
- Click on Disable.
- Enter the correct password to disable content adviser.

- Under the Connection tab, select Never dial a connection.
- Validate your ISP choice using DUN (Dial-Up Node).
- Click OK.
- Select LAN Settings.
- Check the option to automatically detect settings.
- Ensure that the option to Use a Proxy Server option is unchecked.
- Note down your IP address and port.
- If the port is not configured to port 80, uncheck the Use a proxy option.
- Click OK.
- Go to the Advanced tab.
- Select Restore Advanced Settings.
- Choose the option to Use TLS 1.0, Use TLS 1.2, or Use TLS 1.2.

- Select TLS 1.0 and click OK.
- Restart your computer and then try updating QuickBooks to check if the error is resolved.
Method 3: Perform a Clean Install of QuickBooks
- Press the Windows and R keys together to open the Run window.
- Type "Msconfig" and press Enter.
- In the System Configuration window, go to the General tab.
- Uncheck the box next to Load startup items and select Selective Startup.
- Click OK.
- Open the Control Panel from the Start menu.
- Choose Programs and Features.
- Locate QuickBooks in the list of installed programs and select it.
- Click Uninstall/Change, then choose Uninstall and click Done.
- Once QuickBooks is uninstalled, locate the QuickBooks installation file in the download folder and run it.
- Follow the on-screen instructions to complete the installation.
- Click Finish.
- Try updating QuickBooks after the installation is complete.
Method 4: Revert to Normal Startup
- Open the Run window by pressing Windows and R keys together.
- Enter "Msconfig" and press Enter.
- Select the Normal startup option.
- Click Apply and then OK.
- Restart your computer.
- Open QuickBooks and check if the error is resolved.
You may also read: How To Fix QuickBooks Error 15107 (Damaged Update Error)?
If you follow the steps outlined in this article, resolving QuickBooks Error 12031 should be straightforward. If you continue to face this issue, our team of QuickBooks specialists is available to assist you. Contact our experts at the helpline 1-800-761-1787 to get professional help in fixing your accounting issues.